Objectives of this tutorial
In this tutorial we will break down the process leading to an operational GUI with the opentea 3.0 Framework. Before continuing, make sure you already read the post Using JSON SCHEMA for scientific applications?. Indeed, the standard SCHEMA is the cornerstone of Opentea, you cannot continue without a minimal understanding of the concept.
This post is the part 1, focusing on the minimum viable product (MVP) for your GUI. The second part is in an other post, talking about the data flow, and the dynamic Opentea widgets XOR and multiple.
The test project: flow past an obstacle
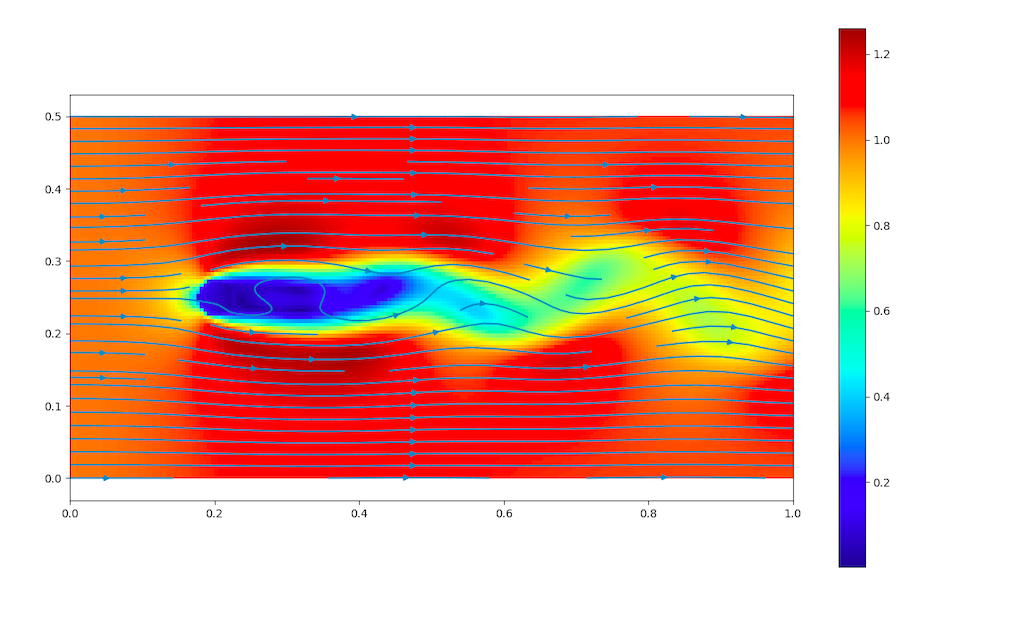
We will build a Graphical User Interface for a CFD application, the flow past an obstacle. The solver behind is the OpenSource test solver Barbatruc In short we must set up a dialog allowing the user to obtain the following kind of result:
The building of the minimum viable GUI should be done in the following order.
The blueprint of the app.
Define the degrees of freedom
First we need a typical input giving the minimal information from the end-user side. We will store it with the YAML format, easier to edit than JSON. Note that most integrated development environments (IDEs) comes with YAML and JSON support, and there is a plethoric diversity of format converters such as json2yaml and obviously yaml2json.
mesh:                # Geometry
  lenght: 1.         # x_direction [m]
  width: 0.3         # y direction [m]
  resolution: 0.01   # delta_x [m]

obstacle:
  type: cylinder
  size: 0.05         # diameter [m]

fluid:
  density: 1.2       # [Kg/m3]
  viscosity: 1.8e-5   # [Kg/(m.s)]
  init_speed: 3.     # [m/s]

numerics:
  poisson_tol: 0.05           # [-] tolerance
  poisson_maxsteps: 4         # [it.] max. iterations to converge
  scheme: "first_order"       # either first_order or centered
A major remark : The d.o.f. must be expressed in terms adapted to the end-user, not to the backend (solver).. Indeed, the GUI task is to translate the user specific case into a runnable job. Pushing the solver jargon onto the end-user would be a User Experience (UX) anti pattern .
The real incentive is to keep an end-user d.o.f. totally separated from the usual solver d.o.f. This will prevent the user being impacted by input changes on the solver, and the solver having to adapt to the user.
Let us add here the recurrent sentences we use in our code reviews:
It is easier to code all the options than identify the few really needed.
If the GUI dialog is too complex, then the feature controlled underneath is not mature enough.
What you do not code, do not fail!
Infer the SCHEMA
As seen in the post Using JSON SCHEMA for scientific applications?, we use a SCHEMA inference with one the the online tools, and convert it to YAML again, because this material is the blueprint of our GUI now:
---
"$schema": http://json-schema.org/draft-04/schema#
type: object
properties:
  mesh:
    type: object
    properties:
      lenght:
        type: integer
      width:
        type: number
      resolution:
        type: number
    required:
    - lenght
    - width
    - resolution
  obstacle:
    type: object
    properties:
      type:
        type: string
      size:
        type: number
    required:
    - type
    - size
  fluid:
    type: object
    properties:
      density:
        type: number
      viscosity:
        type: number
      init_speed:
        type: integer
    required:
    - density
    - viscosity
    - init_speed
  numerics:
    type: object
    properties:
      poisson_tol:
        type: number
      poisson_maxsteps:
        type: integer
      scheme:
        type: string
    required:
    - poisson_tol
    - poisson_maxsteps
    - scheme
required:
- mesh
- obstacle
- fluid
- numerics
We will add now a bit of comments using hashtags # awesome comment to ease our navigation, then start customization with two attributes: title to name gracefully our d.o.f., and default so the user will not have to guess what would be a typical value.
---
"$schema": http://json-schema.org/draft-04/schema#
type: object
properties:

  ##################
  # Tab geometry
  ##################
  mesh:
     title: Geometry
    type: object
    properties:
      lenght:
        title: X-size [m]
        type: number
        default: 3.0
      width:
        title: Y-size [m]
        type: number
        default: 1.0
      resolution:
        title: Resolution [m]
        type: number
        default: 0.01
    required:
    - lenght
    - width
    - resolution

  ##################
  # Tab obstacle
  ##################
  obstacle:
    type: object
    title: Obstacle
    properties:
      type:
        title: shape
        type: string
        default: cylinder
      size:
         title: size [m]
        type: number
        default: 0.3
    required:
    - type
    - size

  ##################
  # Tab Fluid
  ##################
  fluid:
    type: object
    title: Fluid
    properties:
      density:
        title: Density [Kg/m3]
        type: number
        default: 1.2
      viscosity:
        title: Viscosity [Kg/(m.s)]
        type: number
        default: 1.8e-5
      init_speed:
        title: Upstream speed [m/s]
        type: integer
        default: 2.
    required:
    - density
    - viscosity
    - init_speed

  ##################
  # Tab Numerics
  ##################
  numerics:
    type: object
    title: Numerics
    properties:
      poisson_tol:
         title: Poisson Tol. [-]
        type: number
        default: 0.05
      poisson_maxsteps:
        title: Poisson Max substeps.
        type: integer
        default: 4
      scheme:
        title: Scheme
        type: string
        defualt: centered
    required:
    - poisson_tol
    - poisson_maxsteps
    - scheme

required:
- mesh
- obstacle
- fluid
- numerics
The SCHEMA always ends up a bit lengthy. Use an IDE to easily collapse the parts you are not working on. Here we only added the bare minimum, a huge amount of customization will follow. We must head first to an OpenTEA rendering of the present SCHEMA.
Introducing tabs and containers: the two-layers structure
Opentea3 generate forms. The forms are broken into Tabs, which is the first layer of ramification. We have four Tabs candidates now:
- mesh
- obstacle
- fluid
- numerics
To ease packing and keep a consistent dialog between Opentea3 GUIs, there is a second layer of ramification over the tabs : the containers. Containers gather d.o.f. of the same kind, and allow descriptions, documentations and images. There are also special kinds containers (expert, XOR, multiple), coming soon…
Graphically, the container is a box, and you can put boxes in boxes if you want more levels of nesting:
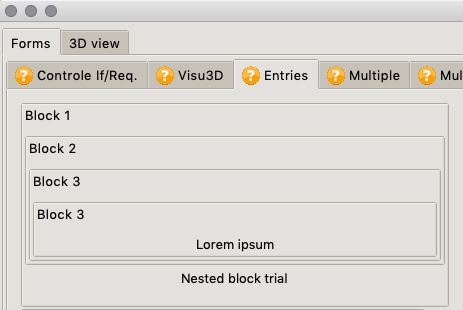
In the example here above, the lowest level shows the description “lorem ipsum” and can have the same title as his ancestor (Block 3).
We will therefore add containers between our d.o.f. and our tabs. Think it like moving a file to a new subfolder inside the initial folder.
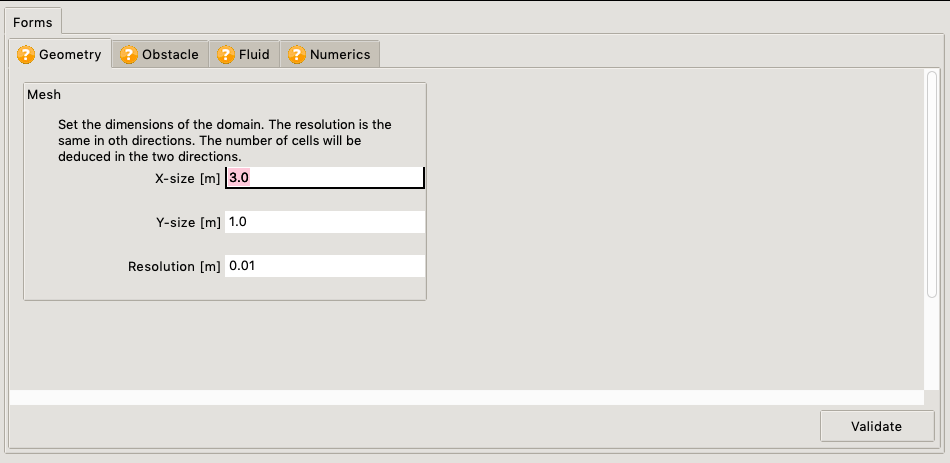
The description attribute should be added at this step to gain clarity:
---
"$schema": http://json-schema.org/draft-04/schema#
type: object
properties:
##################
# Tab geometry
##################
mesh:
title: Geometry
type: object
properties:
# Container Mesh -------------
mesh:
title: Mesh
type: object
description: Set the dimensions of the domain. The resolution is the same in oth directions. The number of cells will be deduced in the two directions.
properties:
lenght:
title: X-size [m]
type: number
default: 3.0
width:
title: Y-size [m]
type: number
default: 1.0
resolution:
title: Resolution [m]
type: number
default: 0.01
required:
- lenght
- width
- resolution
required:
- mesh
#################
# Tab obstacle
##################
obstacle:
type: object
title: Obstacle
properties:
# Container obs_shape -------------
obs_shape:
type: object
title: Obstacle
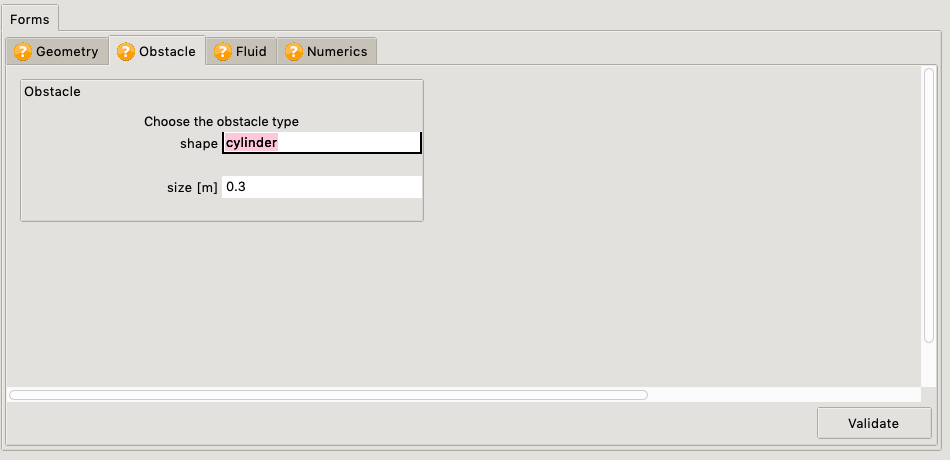
description: Choose the obstacle type
properties:
type:
title: shape
type: string
default: cylinder
size:
title: size [m]
type: number
default: 0.3
required:
- type
- size
required:
- obs_shape
##################
# Tab Fluid
##################
fluid:
type: object
title: Fluid
properties:
# Container thermo_props -------------
thermo_props:
type: object
title: Thermodinamical properties
description: Choose the thermodynamical properties of the fluid.
properties:
density:
title: Density [Kg/m3]
type: number
default: 1.2
viscosity:
title: Viscosity [Kg/(m.s)]
type: number
default: 1.8e-5
required:
- density
- viscosity
# Container incident flow -------------
incident_flow:
type: object
title: Incident flow
description: Choose the incident flow.
properties:
init_speed:
title: Upstream speed [m/s]
type: integer
default: 2.
required:
- init_speed
required:
- thermo_props
- incident_flow
##################
# Tab Numerics
##################
numerics:
type: object
title: Numerics
properties:
# Container poisson -------------
poisson:
type: object
title: Poisson solver
description: Parameters of the Poisson solver used to ensure the zero-divergence field.
properties:
poisson_tol:
title: Poisson Tol. [-]
type: number
default: 0.05
poisson_maxsteps:
title: Poisson Max substeps.
type: integer
default: 4
required:
- poisson_tol
- poisson_maxsteps
# Container poisson -------------
gradients:
type: object
title: Gradients evaluation
description: Numerical method to compute the gradients. Centered schemes are 2nd order but unstable.
properties:
scheme:
title: Scheme
type: string
default: centered
required:
- scheme
required:
- poisson
- gradients
required:
- mesh
- obstacle
- fluid
- numerics
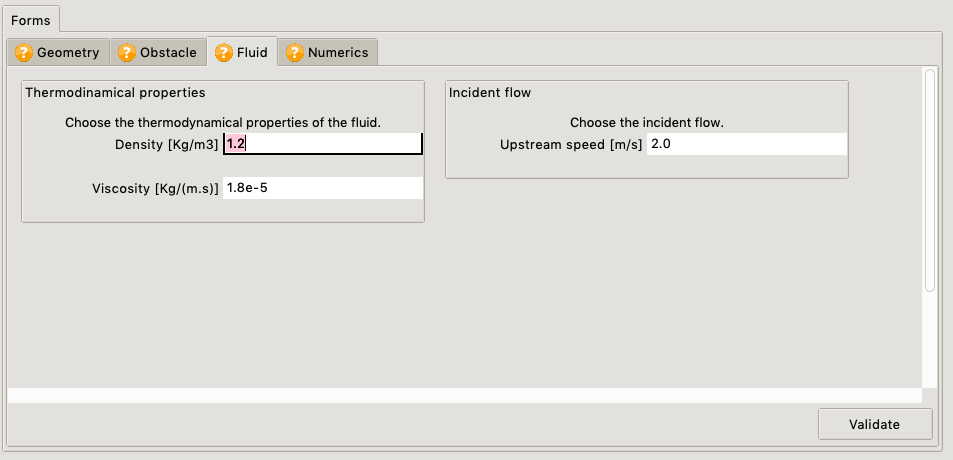
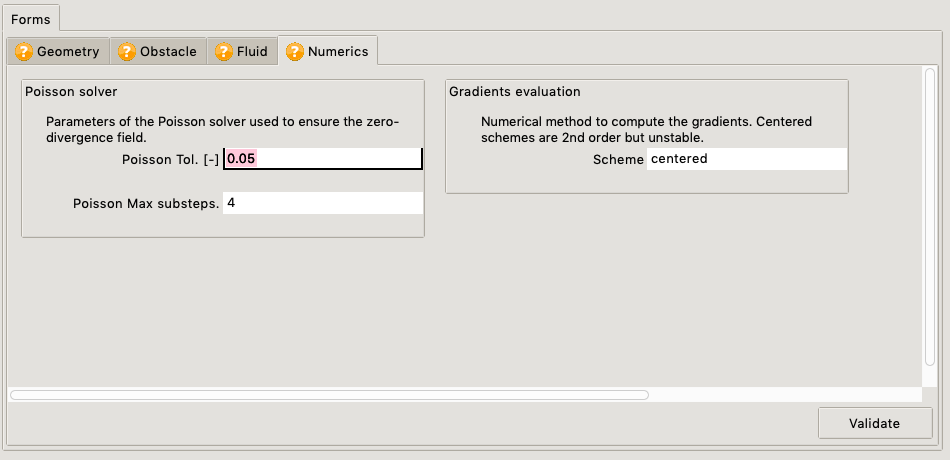
flow_obstacle.yml (full)We created two separated containers in the fluid dialog (thermo_props, incident_flow) and the numerics dialog (poisson, gradients).
Let’s look at the GUI generated on this blueprint.
Starting up the First GUI
To render the GUI we first save our SCHEMA in a YAML file, e.g. flow_obstacle.yml. Make sure your file is well formed, without tabs characters \t and correct indentation. The YAML indentation we use is 2 blank spaces and you need to increase the indentation each time the new object is lower than the previous one. You can check the sanity of the YAML with your IDE, or with one of the online YAML checkers.
We then create the GUI launcher specific to our application. It is a small Python script startup.py almost identical for all apps, unless you want very particular features:
"""Startup script to call gui."""
import os
import inspect
import yaml
from opentea.gui_forms.otinker import main_otinker


def main():
    """Call the otinker gui."""
    schema_file = os.path.join(os.path.dirname(os.path.abspath(__file__)),
                                   "flow_obstacle.yml")
    with open(schema_file, 'r') as fin:
        schema = yaml.load(fin, Loader=yaml.FullLoader)
    base_dir = inspect.getfile(inspect.currentframe())
    base_dir = os.path.dirname(os.path.abspath(base_dir))
    main_otinker(schema, calling_dir=base_dir)


if __name__ == "__main__":
    main()
startup.py (full)It simply calls the Opentea form generator function main_otinker() with two arguments: the SCHEMA and the calling directory.
Now call this script:
> python startup.py
Real-life troubleshooting
In a normal world, you will probably find some error messages here. This can occur at the yaml parsing, e.g.:
yaml.scanner.ScannerError: while scanning for the next token
found character '\t' that cannot start any token
 in "/Users/dauptain/TEST/BARBACYL/flow_obstacle.yml", line 10, column 3
Indeed there was a tab character hidden behind the line 10 col 3. Replacing tabs by two spaces, it is fixed, next error pretty please.
File "/Users/dauptain/GITLAB/opentea/src/opentea/noob/inferdefault.py", line 78, in recursive_infer
    raise RuntimeError(
RuntimeError: Dead end.
 At path : numerics/gradients/scheme
null
Here it is Opentea complaining at path : numerics/gradients/scheme and indeed the YAML is ill-formed:
properties:
  scheme:
  title: Scheme
  type: string
  default: centered
required:
- scheme
We fix the indentation now:
properties:
  scheme:
    title: Scheme
    type: string
    default: centered
required:
- scheme
And, yes, we got our 4 tabs GUI running for the first time:
And if we save the project, we get the following data:
fluid:
  incident_flow:
    init_speed: 2.0
  thermo_props:
    density: 1.2
    viscosity: 1.8e-05
mesh:
  mesh:
    lenght: 3.0
    resolution: 0.01
    width: 1.0
meta:
  validate:
    fluid: 0
    mesh: 0
    numerics: 0
    obstacle: 0
numerics:
  gradients:
    scheme: centered
  poisson:
    poisson_maxsteps: 4
    poisson_tol: 0.05
obstacle:
  obs_shape:
    size: 0.3
    type: cylinder
Cheers, we got the first half done, -the graphical part-, and you can already show it to the customer!
Tuning GUI attributes for more interactions
First we will help the user to choose the correct values.
THere will be no effect on the scenario.
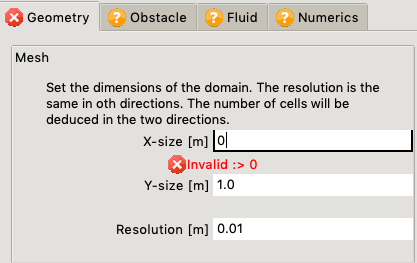
Values can be bounded with attributes, preventing for example the input of a null or negative length (SCHEMA attributes minimum and exclusiveMinimum):
lenght:
    title: X-size [m]
    type: number
    default: 3.0
    minimum: 0
    exclusiveMinimum: true
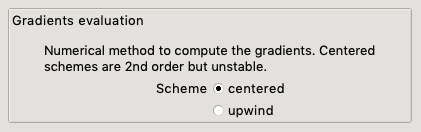
Another common element is the choice between two options (SCHEMA attribute enum).
 scheme:
    title: Scheme
    type: string
    default: centered
    enum: [centered, upwind]
You can now dig in the GUI building Opentea documentation to see the possibilities for human-friendliness.
Linking the GUI to the software : the scenario
In the Opentea jargon, the scenario is:
- the code calling to the solver API
- a code that can be called outside the GUI
We will now build the scenario of the cylinder resolution. In Barbatruc, there is already an example for the cylinder. We take this example and create the scenario.
"""Example on how to solve a Karmann Street problem with the navier stokes solver"""

from barbatruc.fluid_domain import DomainRectFluid
from barbatruc.fd_ns_2d import NS_fd_2D_explicit
import yaml
__all__ = ["obs_senario"]

# pylint: disable:too-many-arguments
def obs_scenario(
        lenght=1.0,
        width=0.5,
        delta_x=0.005,
        diameter=0.05,
        nu_=0.0005,
        vel=1.0,
        nsave=200,
        press_maxsteps=200,
        ):
    """Startup computation
    solve a cylinder obstacle problem
    """
    t_end = 4.0 * lenght / vel
    dom = DomainRectFluid(dimx=lenght, dimy=width, delta_x=delta_x, nu_=0.0005)
    dom.add_obstacle_circle(x_c=0.2 * lenght, radius=0.5 * diameter)
    dom.switch_bc_xmin_inlet(vel_u=vel)
    dom.switch_bc_xmax_outlet()
    dom.fields["vel_u"] += vel
    dom.fields["vel_v"] += 0.1 * vel

    print(dom)
    time = 0.0
    time_step = t_end / nsave

    solver = NS_fd_2D_explicit(
        dom,
        max_vel=2.0 * vel,
        obs_ib_factor=0.4,
        obs_ib_integral=False,
        # obs_ib_factor=0.001,
        press_maxsteps=200,
        damp_outlet=True,
    )
    for i in range(nsave):
        solver.iteration(time, time_step)
        time += time_step
        print("\n\n===============================")
        print(f"\n  Iteration {i+1}/{nsave}, Time :, {time}s")
        print(f"  Reynolds : {dom.reynolds(diameter)}")
        print(dom.fields_stats())
        dom.dump_paraview(time=time)
        dom.dump_global(time=time)
    dom.show_fields()
    dom.show_flow()

    print("Normal end of execution.")

if __name__ == "__main__":
    obs_scenario()
obs_scenario.py (full)That is a lot of arguments in the signature. If you feel bad concerning your pylint score, as Practicality beat purity (Pep20) disable locally the argument rule like in the example here above. Calling this python script should run the simulation right away:
> python obs_scenario.py
.  Rectangular Grid.
=======================

     y_max: 0.5m, nodes: 100
     +----------------------------+
     |                            |
     |                            |
     |                            |
     |                            |
     |                            |
     +----------------------------+
   (0,0)                        x_max: 1.0m, nodes: 200

(...)
Feeding the scenario with custom data
Now we can easily link the dataset of our form to this scenario.
Outside the GUI, we can test the following footer in the file obs_scenario.py:
if __name__ == "__main__":
    with open("tmp.yml", 'r') as fin:
        data = yaml.load(fin, Loader=yaml.FullLoader)
    obs_scenario(
        lenght=data["mesh"]["mesh"]["lenght"],
        width=data["mesh"]["mesh"]["width"],
        delta_x=data["mesh"]["mesh"]["resolution"],
        diameter=data["obstacle"]["obs_shape"]["size"],
        nu_=data["obstacle"]["thermo_props"]["density"],
        vel=data["fluid"]["incident_flow"]["init_speed"],
        nsave=200,
        press_maxsteps=data["numerics"]["poisson"]["poisson_maxsteps"]
    )
obs_scenario.py (partial)This works fine, but we can make it more good looking : there are too many [""][""][""] and any change in the GUI structure -the SCHEMA actually- would have to be reflected here.
We encourage you to use the nob package, especially designed for a fast navigation in large nested objects. Read more on fetch information from large datatrees.
The lighter version is therefore:
if __name__ == "__main__":
    with open("tmp.yml", 'r') as fin:
        data = yaml.load(fin, Loader=yaml.FullLoader)

    nob_dof = nob.Nob(data)
    obs_scenario(
        lenght=nob_dof.lenght[:],
        width=nob_dof.width[:],
        delta_x=nob_dof.resolution[:],
        diameter=nob_dof.size[:],
        nu_=nob_dof.density[:],
        vel=nob_dof.init_speed[:],
        nsave=200,
        press_maxsteps=nob_dof.poisson_maxsteps[:]
    )
obs_scenario.py (partial)As the paths to the d.o.f. are no more hard-coded, you can now move each attribute to different tabs or containers. If you break something, nob will send you a clear error message.
Linking the scenario to the GUI
The last bit remaining is the link between the scenario and the GUI.
For this purpose we will add a callback to the last tab called process_finish.py.
We create a very simple process_finish.py first :
"""Module for the first tab."""

from opentea.process_utils import process_tab


def custom_fun(nob):
    print("hello world")

if __name__ == "__main__":
    process_tab(custom_fun)
process_finish.py (full)Then we tell the GUI to link this small element to the last tab:
##################
# Tab Numerics
##################
numerics:
    type: object
    title: Numerics
    process: process_finish.py
    properties:
       (...)
You should now have the following folder containing your app:
.
├── flow_obstacle.yml
├── obs_scenario.py
├── process_finish.py
├── startup.py
└── tmp.yml
We can crash test this new callback. You should get:
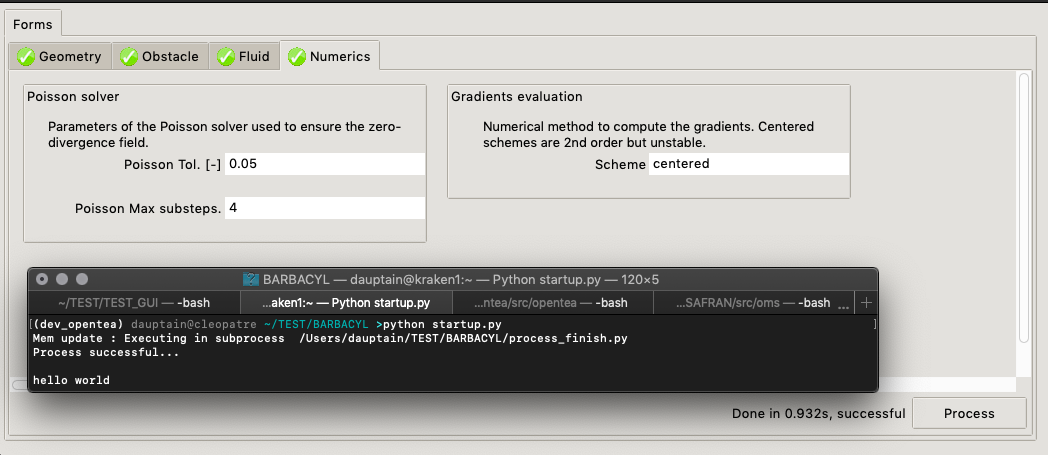
No we make a proper call to the scenario in the process_finish.py:
"""Module for the first tab."""

from opentea.process_utils import process_tab
from obs_scenario import obs_scenario
import nob

def custom_fun(nobdata):
    print("hello world")

    nob_dof = nob.Nob(nobdata)
    obs_scenario(
        lenght=nob_dof.lenght[:],
        width=nob_dof.width[:],
        delta_x=nob_dof.resolution[:],
        diameter=nob_dof.size[:],
        nu_=nob_dof.density[:],
        vel=nob_dof.init_speed[:],
        nsave=200,
        press_maxsteps=nob_dof.poisson_maxsteps[:]
    )
    return nob_dof[:]


if __name__ == "__main__":
    process_tab(custom_fun)
process_finish.py (full)The input of this function is nobdata, a Python nested object. The output of the function is the updated version of nobdata.
This is how you can change the values of the GUI from the callback.
Note : Opentea is expecting a Python nested object at the output. If you are using the Fast access Nob object, make sure you return the value of the Nob object (return nob_dof[:]) and not the object itself (return nob_dof).
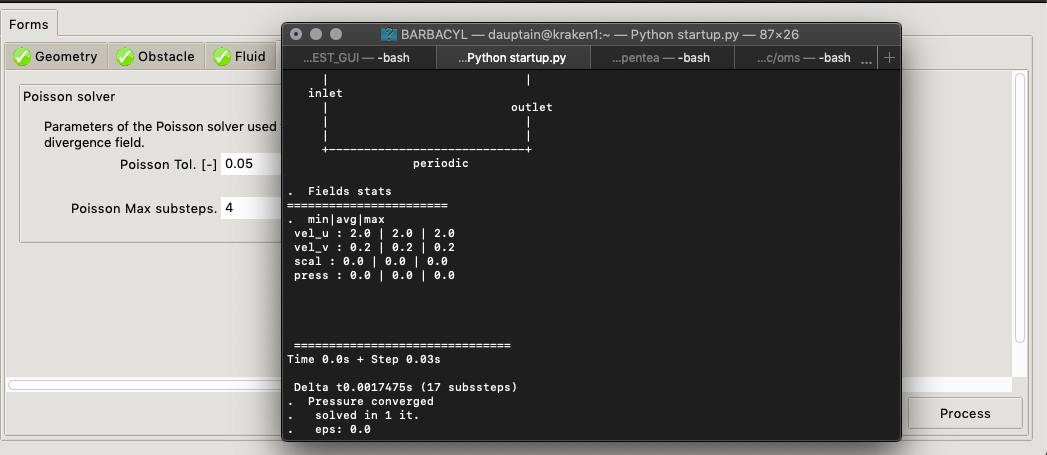
You should get the following result: the GUI is really launching Barbatruc according to the dialogs:
Takeaway
After this tutorial you should know how to perform the following tasks:
- Infer a SCHEMA from an initial YAML draft of the degrees of freedom.
- Adapt the SCHEMA for a first simple GUI.
- Create a scenario adapted to your case.
- Link the scenario to the GUI with a callback.
- Add validation rules to the entries of the GUI.
At the end of this first part, you should have a minimum viable product, a GUI linked to the software. If you want a deeper understanding on how to design the scenario, and if you plan to use the more complex XOR and multiple widgets, proceed to the part 2 of this tutorial : Building a GUI with OpenTEA - Part 2
Please let us know if this tutorial was useful, and how we could improve it. Fare well…