Objectives of this tutorial
This tutorial is the sequel to Building a GUI with OpenTEA - Part 1. We simply continue with the same example, adding considerations on the data flow circulating in the scenario, and the two big dynamic features of Opentea, the XOR and the Multiple.
Cleaning back-stage
Scenario interface
We strongly encourage the use of explicit positional arguments in the scenario itself. This will bring a lot of clarity to the people in charge of the support. You can read more on this practice in the PEP 3102 - Keyword-Only Arguments
The accumulation of arguments (more than five) is against the pylint default rule of max 5 arguments. However, in the special case of the scenario, the interface in front of your solver, having many well documented arguments are a good idea.
A word about nested-objects and data flow
The Opentea data flow must be as explicit as possible. The data of Opentea is a nested dict. This is very flexible for data management, but can make the data flow hard to read once in the code. To the future developer, a scenario irrigated by nested-objects can look like a transparent lock, with an input you must reverse-engineer each time via trials and errors. This pitfall is hard to tackle for large GUIs. Here are our hints:
- Do not pass a nested-object as an argument when you can.
- If you cannot avoid it, prefer a single level of nesting.
- A small-sized SCHEMA can test and document the nested-object. Still, it is a bit overkill, and readability is average at best. This can be pertinent for atomic infos, such as a large main ASCII input file.
- You probably would get a better readability with a small object storing the same data with strict rules, the tiniest being the NamedTuple.
To finish this side-talk, we put here the conversion between the SCHEMA node components and their usual Python representation in our scenarios.
| SCHEMA | Python | traits |
|---|---|---|
| arrays | lists | ordered sets of similar kinds of objects |
| objects | dicts | non-ordered sets of variable kinds of objects |
SCHEMA objects with all properties required and none other tolerated could be translated into Python NamedTuples. Note that a python list could gather different kinds of data, but do set up this trap for fun in the scenario please.
Dynamic widgets of Opentea
Using Opentea’s ‘XOR’ (Mutually exclusive d.o.f.)
Now we will shift major parts of the tree, to access various representations : we will open the dialog on the obstacle:
- no obstacle.
- a cylinder, with a diameter.
- a rectangle with a length and width.
In terms of tree structure, we have seen until now dialogs limited to the leaves of the d.o.f. tree, (or external nodes or terminal nodes). The XOR will allow changes at an internal node level. Below this node, the very structure of the tree can change completely.
The SCHEMA adaptation is the following, inspired from the XOR snippet example of the Opentea documentation.
#################
# Tab obstacle
##################
obstacle:
type: object
title: Obstacle
properties:
# XOR Container obs_shape -------------
obs_shape:
title: "Select config."
type: object
oneOf:
- type: object
required: [no_obstacle]
properties:
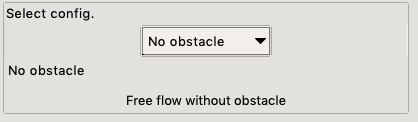
no_obstacle:
type: object
title: No obstacle
description:
Free flow without obstacle
properties:
void:
type: string
ot_type: void
default: void
required:
- void
- type: object
required: [cylinder]
properties:
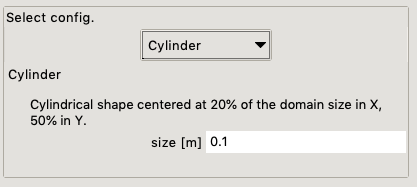
cylinder:
type: object
title: Cylinder
description:
Cylindrical shape centered at 20% of the domain size in X, 50% in Y.
properties:
size:
title: size [m]
type: number
default: 0.1
required:
- size
- type: object
required: [rectangle]
properties:
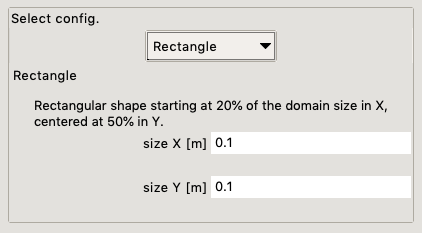
rectangle:
type: object
title: Rectangle
description:
Rectangular shape starting at 20% of the domain size in X, centered at 50% in Y.
properties:
size_x:
title: size X [m]
type: number
default: 0.1
size_y:
title: size Y [m]
type: number
default: 0.1
required:
- size_x
- size_y
required:
- obs_shape
flow_obstacle.yml (partial)We can switch between three options:
Pay attention to the void string leaf :
properties:
    void:
      type: string
      ot_type: void
      default: void
We want to explicitly add an object without properties. Several conventions could have been chosen.
We stick now to this particular one because the void value will be visible on our datasets: explicit is better dans implicit.
(The other convention option properties: {} was confusing people. A more SCHEMA-like option would have been the non-choice , i.e. no child node under obs_shape, but it was going far away from the Mutually exclusive explicit options mind-set of the legacy Opentea 2.0)
Linking a XOR widget to a scenario.
First we adapt the scenario. The initial dict is simple, but you will soon discover the cold truth:
you cannot trust a nested dict to always be the way you wanted it.
We therefore create a small object in the scenario file (Important!) representing all possible obstacles:
from typing import NamedTuple

class Obstacle(NamedTuple):
    """Define an Obstacle object.

    shape:  str, either None, cylinder or rectangle
    dim1: float, either None or meters
    dim2: floar, either None or meters"""
    shape: str = None
    dim1: float = None
    dim2: float = None

my_obs = Obstacle(shape="cylinder", dim1=0.1)
print(my_obs)
obs_scenario.py (partial)which gives
> Obstacle(shape='cylinder', dim1=0.1, dim2=None)
Here we took NamedTuplefrom the typingpackage, because we want to control even the types stored in this object. We adapt the scenario to read this Obstacle thing:
def obs_scenario(
        lenght=1.0,
        width=0.5,
        delta_x=0.005,
        obs=Obstacle(),
        nu_=0.0005,
        vel=1.0,
        nsave=200,
        press_maxsteps=200,
        ):
    """Startup computation
    solve a cylinder obstacle problem
    """
    t_end = 4.0 * lenght / vel
    dom = DomainRectFluid(dimx=lenght, dimy=width, delta_x=delta_x, nu_=0.0005)

    char_len = width
    if Obstacle.shape == "cylinder":
        char_len = Obstacle.dim1
        dom.add_obstacle_circle(x_c=0.2 * lenght, radius=0.5 * Obstacle.dim1)
    elif Obstacle.shape == "rectangle":
        char_len = Obstacle.dim2
        llx = 0.2 * lenght
        llx = 0.2 * lenght

        dom.add_obstacle_rect(
            ll_x=0.2 * lenght,
            ll_y=0.5 * width - 0.5*Obstacle.dim2,
            ur_x=0.2 * lenght + Obstacle.dim1,
            ur_y=0.5 * width + 0.5*Obstacle.dim2,
    ...
obs_scenario.py (partial)This way, even without a full docstring for the scenario (bad, bad, bad!) the signature of the function states clearly what to expect.
Now we can link the new GUI to this new object:
from opentea.process_utils import process_tab
from obs_scenario import obs_scenario, Obstacle, Profile
import nob

def custom_fun(nobdata):
    print("hello world")

    nob_dof = nob.Nob(nobdata)

    # Get the child name of node -obs_shape-.
    obstacle_kind = list(nob_dof.obs_shape.keys())[0]

    my_obs = Obstacle()
    if obstacle_kind == "cylinder":
        my_obs = Obstacle(shape="cylinder", dim1=nob_dof.size[:])
    elif obstacle_kind == "rectangle":
        my_obs = Obstacle(shape="rectangle", dim1=nob_dof.size_x[:], dim2=nob_dof.size_y[:])

    obs_scenario(
        lenght=nob_dof.lenght[:],
        width=nob_dof.width[:],
        delta_x=nob_dof.resolution[:],
        obs=my_obs,
        nu_=nob_dof.density[:],
        vel=nob_dof.init_speed[:],
        nsave=200,
        press_maxsteps=nob_dof.poisson_maxsteps[:]
    )
    return nob_dof[:]

if __name__ == "__main__":
    process_tab(custom_fun)
process_finish.py (full)As you can see, the Obstacle comes from the scenario, helping a standalone usage and support of the no-GUI (or batch mode) process.
The identification of the XOR state is a bit clunky:
# Get the child name of node -obs_shape-.
    obstacle_kind = list(nob_dof.obs_shape.keys())[0]
First we get the children of obs_shape as keys, we convert it to a list() and get the first and only element of the list [0]. This looks ugly because we stored information with the node name itself -obs_shape/cylinder-. There is no leaf node with the value cylinder, which could have given a nicer ob_dof.obs_shape.state[:]. The reason we did not added this node is simple: we wanted to avoid discrepancies between the state and the data underneath.
The XOR state info is the name of the child, and that is the way it gonna be…
Opentea’s ‘multiples’ nodes (Replicable dialogs)
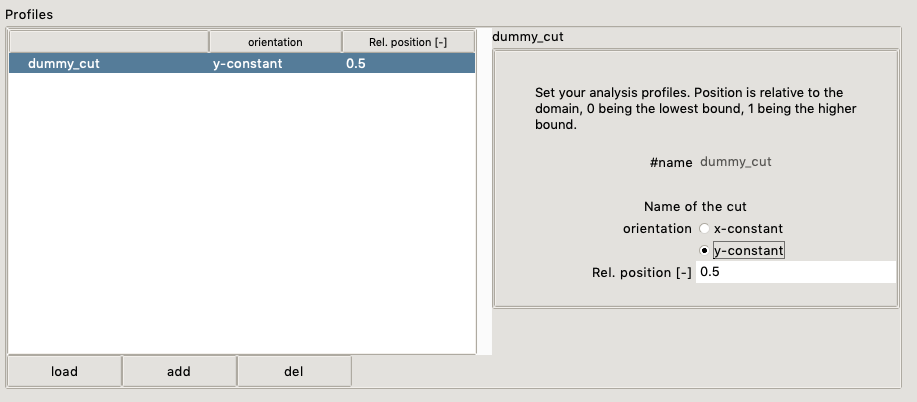
Finally we will see how to create a multiple dialog, i.e. a repetition of a data pattern.
For our test application we will let the user add one or more post-processing cuts, either in the X or the Y direction. For this purpose, we will insert a new tab, called “Profiles”, thanks to the multiple snippet example in the Opentea documentation:
  ##################
  # Tab Outputs
  ##################
  outputs:
    type: object
    title: Outputs
    properties:
      # Container Muliple profiles -------------
      profiles:
        title: Profiles
        type: array
        items:
          type: object
          description: >
            Set your analysis profiles. Position is relative to the domain, 0 being the lowest bound, 1 being the higher bound.
          properties:
            name:
              type: string
              description: Name of the cut
              default: dummy_cut
              state: disabled
            orientation:
              type: string
              title: orientation
              default: x-constant
              enum: [x-constant, y-constant]
            position:
              type: number
              title: Rel. position [-]
              default: 0.5
              minimum: 0.0
              maximum: 1.0
          required:
          - name
          - orientation
          - position
    required:
    - profiles
flow_obstacle.yml (partial)The GUI is now featuring a table-like dialog with an arbitrary complexity for each member of the table.
Linking a multiple widget to a scenario.
Here again we will create a tiny object to represent a single profile element in the scenario.
class Profile(NamedTuple):
    """Define a profile object.

    shape:  str, either None, x, or y
    position: float, btw 0. and 1. included"""
    direction: str = None
    position: float = None
obs_scenario.py (partial)The main scenario function changes this way, with a new optional argument profiles = [Profile()]:
def obs_scenario(
        lenght=1.0,
        width=0.5,
        delta_x=0.005,
        obs=Obstacle(),
        profiles = [Profile()],
        nu_=0.0005,
        vel=1.0,
        nsave=200,
        press_maxsteps=200,
        ):

    (...)

    (temporal loop)

    (...)

    for prof in profiles:
        if prof.direction == "x":
            pos = prof.position*length
            dom.show_profile_y(xtgt=pos)
        if prof.direction == "y":
            pos = prof.position*width
            dom.show_profile_x(ytgt=pos)


    print("Normal end of execution.")
obs_scenario.py (partial)Again it would be hard to misunderstand what the scenario is expecting judging from the signature.
Finally we create the corresponding list of objects in the process_finish.pycallback:
from opentea.process_utils import process_tab
from obs_scenario import obs_scenario, Obstacle, Profile
import nob


def custom_fun(nobdata):
    print("hello world")

    nob_dof = nob.Nob(nobdata)

    # Get the child name of node -obs_shape-.
    obstacle_kind = list(nob_dof.obs_shape.keys())[0]

    my_obs = Obstacle()
    if obstacle_kind == "cylinder":
        my_obs = Obstacle(shape="cylinder", dim1=nob_dof.size[:])
    elif obstacle_kind == "rectangle":
        my_obs = Obstacle(shape="rectangle", dim1=nob_dof.size_x[:], dim2=nob_dof.size_y[:])

    list_profiles = list()
    for prof_rank in nob_dof.profiles:
        # the nob_object for each profile -list_profiles-
        nob_prof = nob_dof.profiles[prof_rank]
        list_profiles.append(
            Profile(
                direction=nob_prof.orientation[:],
                position=nob_prof.position[:]
            )
        )

    obs_scenario(
        lenght=nob_dof.lenght[:],
        width=nob_dof.width[:],
        delta_x=nob_dof.resolution[:],
        obs=my_obs,
        profiles= list_profiles,
        nu_=nob_dof.density[:],
        vel=nob_dof.init_speed[:],
        nsave=10,
        press_maxsteps=nob_dof.poisson_maxsteps[:]
    )
    return nob_dof[:]

if __name__ == "__main__":
    process_tab(custom_fun)
process_finish.py (full)Takeaway
After this tutorial you should know how to perform the following tasks:
- Clean up the data flow circulating through your scenario.
- Insert a XOR dialog with the corresponding callback.
- Insert a Multiple dialog with the corresponding callback.
This tutorial showed only one way to do your GUI. There are countless variations with the exact same user experience. What we tried to stress during this tutorial was related to the recurrent cost of your GUI. More than any other development, GUIs are needed only when a serious demand is expected on a software, and with usage comes bugs and angry users. From our experience, we tried to propose solutions that, in the long run, will reduce the work needed for extension, support and debugging…
- pay attention to readability and explicit data flow at all time
- keep the GUI callbacks and the scenario well separated. The scenario should be self-contained, with an obvious signature. (Even user will use the scenario in the end.)
- It is ok to use a lot of positional arguments (keywords argument or flat dictionary if you want), rather than raw nested-objects inside the scenario…
- … but if you cannot, a SCHEMA will help you to keep your nested object under control.
- use small-sized, clearly documented objects to store case specific data structures. NamedTuples are a tiny but nice first step.
Please let us know if this tutorial was useful, and how we could improve it. Fare well…