Overview of Antares basic classes
In this tutorial you will learn how to use the main classes of the Antares Application Programming Interface.
We will detail the creation of Base, Zone, and Instant objects.
First, we have to load the antares package.
import antares as ant  # if you only want to type 3 letters instead of 7 in the following
# or import antares
# but not: from antares import * (cf. https://www.python.org/dev/peps/pep-0008/)
All objects, classes, and functions exposed to the developer can be found with
print(ant.__all__)
The Antares API is based on a data structure. It is a CFD-oriented data structure, but formally not restricted to CFD data.
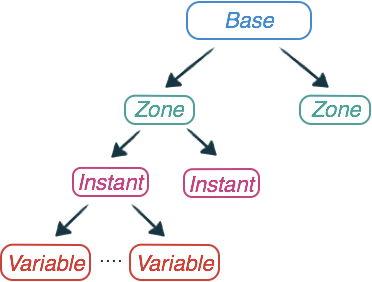
The main class is called the Base class, which is the top-level node of the data structure. An instance of the Base class (named a Base in the following) is essentially a container of Zone instances.
Each Zone is basically a collection of Instant instances.
A Zone is typically a block of a mesh (a sub-domain of the overall mesh): + a block in a multiblock mesh, or + a parallel partition of an unstructured mesh
but it can also be a set of probes, etc.
Each Instant is a container of variables.

image
Base Class
When you create a Base object, you are creating an instance of the Base class, or you are instantiating the Base class.
In the following, we will indifferently refer to the class or the object by the word Base. The same thing will apply to other Antares objects in general.
First, we instantiate a Base and print the object to see what this base contains.
base = ant.Base()
print(base)
print(base.grid_points)
print(base.families)
What more can I do with a Base object ?
You can see all the attributes and methods of the Base with the next instructions.
# base.[TAB] -> try completion key
# base.
# or python help function
help(base)
Zone Class
The Zone is the first sub-level of a Base.
It can contain many Instant instances.
For example, a Zone can be seen as a block within a multi-block configuration or as a parallel partition of an unstructured mesh in the context of domain decomposition.
zone = ant.Zone()
print(zone)
print(zone.boundaries)
# zone.[TAB] -> try completion key
# zone.
# or
help(zone)
Instant Class
The Instant is the last level of the Antares Base data structure.
The term Instant, although it has a connotation of time, should not be seen as such.
For example, it can be seen as a temporal snapshot of an unsteady phenomenon, or as a sample from a sampling carried out on a steady configuration.
It can contain many variables stored as numpy (https://numpy.org) arrays.
inst = ant.Instant()
print(inst)
print(inst.connectivity)
# instant.[TAB] -> try completion key
# inst.
# or
help(inst)
We have seen how to build instances of Base, Zone, and Instant classes.
Let’s go further and look at their interactions.
First, a very important thing to know is that these three classes derived from a Python ordered dict. So, their instances are ordered dictionaries.
Adding a zone to a base is simply mapping a string (the zone name) to a Zone object.
base['z1'] = zone  # add an entry to the dictionary
print(base)
You can not use an integer key to map the Zone object.
Please see the python documentation on dict.
# remove the comment to check that a zone must have a name
# base[1] = zone
In the Base, each Zone is associated to a string (here ‘z1’).
There are two ways to reference zones: with a string (str) and with an integer (int)
print(base['z1']) # Python dict!
print(base[0]) # Python ordered dict!
If the reference does not exist in the base, then you get an error message.
# remove the comment to check that the zone with this name is not in the base
# print(base['unknown_zone_name'])
# remove the comment to check that there is only one zone in the base
# print(base[1])
Adding an instant to a zone is simply mapping a string (the instant name) to an Instant object.
zone['t1'] = inst
print(zone)
In the Zone, each Instant is associated to a string (here ‘t1’).
There are two ways to reference instants: with a string (str) and with an integer (int)
If the reference does not exist in the zone, then you get an error message.
print(zone['t1'])
print(zone[0])
At this point, we have a base that contains one zone that contains one Instant.
Let us put some data in the instant.
Variables are defined by a tuple of a name and a location: (‘name’, ‘location’)
The name of a variable is a string.
The location can be ‘node’, by default, or ‘cell’. (CFD-oriented)
A geometric element has vertices (nodes), edges, and faces.
‘nodes’ are for variables located at the vertices, and ‘cell’ for variables located at the element barycenter (1 degree of freedom (DOF) per element).
If only the name is used, then ‘node’ is automatically added.
inst['v1'] = 1
print(inst)
All variables are stored in numpy arrays.
That way, we can benefit from all features of the numpy library. In particular, it is very effective for large datasets.
type(inst['v1'])
inst[('v2', 'cell')] = [2]
print(inst)
Variables that have the same name but a different location are not the same variables. They are stored in different arrays.
import numpy as np
inst[('v1','cell')] = np.arange(4)
print(inst)
(‘v1’, ‘node’) and (‘v1’, ‘cell’) are different arrays.
Of course, you can look at the content of variables.
print(inst[('v1','cell')])
print(inst['v1'])
print(inst['v2'])
print(inst[('v2','cell')])
Now, we have all material to build a basic base.
Let us see some more details about the Instant.
When you print an instant, then you see the shape.
The shape of the instant is the size of node values.
For example, it corresponds to the number of nodes (points, vertices) for unstructured grids.
import numpy as np
inst = ant.Instant()
inst['v1'] = np.arange(6)
inst[('v2','cell')] = np.arange(2)
print(inst)
For example, it shows a tuple (Imax, Jmax, Kmax) with the number of nodes in each direction of a block for structured grids.
import numpy as np
inst = ant.Instant()
inst['v1'] = np.arange(6).reshape(3,2)
inst[('v2','cell')] = np.arange(2)
print(inst)
The other way round. Look at the differences compared to the previous results.
inst = ant.Instant()
inst[('v2','cell')] = np.arange(2)
print(inst)
inst['v1'] = np.arange(6)
print(inst)
Once the shape is set, you cannot set another variable located at nodes with another shape.
# remove the comment to check that another variable located at nodes with another shape cannot be set
# inst['v3'] = np.arange(3)
Once the shape is set, you cannot change it
# remove the comment to check that the shape cannot be changed
# inst['v1'] = np.arange(3)
The shape can only be set if there is no shape set beforehand.
del inst['v1']
print(inst)
inst['v1'] = np.arange(3)
print(inst)
As already seen, the variables can be multi-dimensional numpy arrays. For example, 2D or 3D structured grids.
inst = ant.Instant()
inst['v2'] = np.arange(4).reshape(2, 2)
print(inst)
inst = ant.Instant()
inst['v2'] = np.arange(16).reshape(2, 2, 4)
print(inst)

